BLOG
Jul
2014
Installing PhoneGap/Cordova on Windows and Linux
Introduction
PhoneGap/Cordova is a powerful tool that allows you to write applications in JavaScript and cross-compile them for Windows, Linux, Mac OS X, Android, iOS, and a number of other platforms. I was recently given the opportunity to work with Cordova, and I found that the installation was both laborious and rife with error messages and frustration. I wrote down every issue I ran into, and created this guide to help others trying to install the system. I tried to link to my sources wherever relevant.
This guide assumes you’re using either Windows 7/8 or a Debian-based Linux distribution. Using Linux is actually much easier, but if you don’t use it as your primary operating system, you’ll need to run it in a virtual machine. Emulating Android on top of a virtualized OS can be quite slow.
In addition, this guide works with Cordova/PhoneGap 3.4, and Android Tools rev. 19. Apparently newer versions have some issues, at least according to this StackOverflow post. I didn’t research what these issues were, but things compiled with this tool chain seem to run fine on Android phones (both real and emulated). In the instructions that follow, I detail how to get specifically those tools. For the most part, the guide must be followed in this order (the Node Package Manager must be installed first in order to utilize it to install PhoneGap, for example).
Also note that when we modify the PATH variables in Windows, we do it in a persistent way – setx should affect the PATH into the future. You should therefore make a backup of your PATH before starting, just in case you mess it up. For Linux, take the “export” commands and put them into something that’s run on startup, like ~/.bashrc or ~/.profile (see this post for more details).
Table of Contents
Steps
Install the JDK
The JDK is the Java Development Kit (which allows you to compile Java). It can be downloaded from the Oracle site.
See Errors Encountered – “JAVA_HOME” NOT SET section for proper JDK installation on Windows if there is already a JRE present. It does not appear to be necessary on Linux.
Download Eclipse/Android SDK
First, download the appropriate Eclipse/Android SDK package from the Android site. Extract the downloaded files to a location where you can leave them permanently.
We now need to add this location to the PATH. Note that the locations in the commands must match the locations of the actual files/directories on your file system – the commands below are just examples.
On Linux:
$ export PATH=$PATH:/opt/java/adt-linux/sdk/platform-tools:/opt/java/adt-linux/sdk/tools
$ echo $PATH
On Windows:
> setx PATH "%PATH%;C:\adt-windows\sdk\tools;C:\adt- windows\sdk\platform-tools"
::Exit command prompt and reopen for setx to take effect
> path
The final “echo $PATH” or “path” commands should display the current PATH variable, including the two additions we just made. You should also now be able to run the “android” command to start the Android SDK Manager. Note that it may take a few seconds for it to start up.
See Errors Encountered – 32-bit Libraries Missing on Linux if you’re using Linux and the ia32-libs library is missing.
Install Android Build Tools, Rev. 19
Because we’re using Cordova/PhoneGap 3.4, we need to use the compatible version of the Android Build tools, which is Revision 19.

Once the Android Package Manager is open and loaded, you should see an “Install # Packages” button on the bottom-right. It should be instructing you to download the most recent versions of the Android SDK tools. I allowed it to install those, but in addition, I also installed “Tools – Android SDK Build-tools (Rev. 19)” as well as “Android 4.4.2 (API 19)” (and all of the tools within it). Some of the tools within the API most likely aren’t needed (like the Glass Development Kit Preview), but I downloaded them anyway. Note that you may need to check off “Show: Obsolete” if you don’t see version 19.
It may take a significant amount of time to download all of the necessary tools.

Install Apache Ant
Apache Ant is a tool for automating the Java build process, and is required for Cordova to be able to build the .apk file that an Android phone can then install.
On Linux, run:
sudo apt-get install antAnt should automatically be added to the PATH.
On Windows, download the appropriate setup file from the Apache site and extract it to a location you’ll remember. Since Ant is not automatically added to the PATH, run the following:
> setx PATH "%PATH%;C:\apache-ant-1.9.4\bin"
::Exit command prompt and reopen for setx to take effect
> path
Note that you have to change the location/version in the command to the correct location/version of ant on your computer. To make sure it “stuck”, run the “ant” command in the command prompt. You should receive an ant-related error (specifically “Buildfile: build.xml does not exist!”), which means that the ant command has been run but it can’t actually build anything. If, however, you receive a message saying “‘ant’ is not recognized as an internal or external command”, it means you have not correctly added it to the PATH.
Install Node Package Manager
PhoneGap/Codova is released as a package for NPM, the Node Package Manager. We’ll need to download it in order to issue the relevant commands for install PhoneGap/Cordova.
On Linux, run:
sudo apt-get install npmOn Windows, download the appropriate setup file from the NodeJS site and run it.
In both cases, npm should automatically be added to your PATH.
Install PhoneGap and Cordova
Once NPM is installed, we can use it to install PhoneGap and Cordova. The commands for these are identical on Windows and Linux, but on Linux you may have to add “sudo” before the command, depending on your user’s privileges. See Introduction section for why version 3.4 is specified.
npm install –g [email protected]
npm install –g [email protected]
If the “npm” command fails on Linux, see Errors Encountered – Link Nodejs and Node Folders on Linux for a possible solution.
Set Up Android Virtual Device
From the command line (Windows or Linux), run the command “android avd” to launch the Android Virtual Device manager. We will use this to set up a virtual Android device on which our app will be emulated.
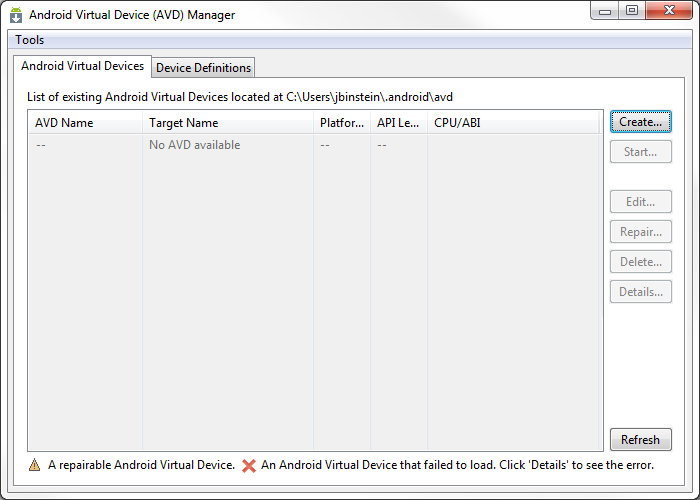
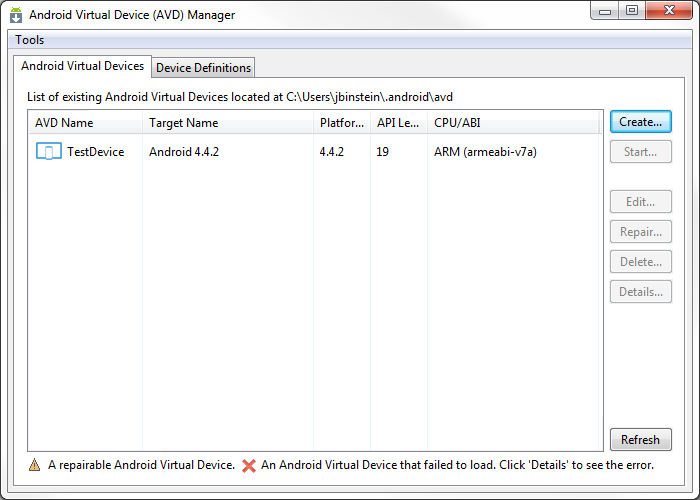
Hit the “Create…” button on the to-right, and fill in the form.
- AVD Name: I chose to name my device TestDevice (you should probably pick a more descriptive name if you’re going to emulate more than one device)
- Device: I chose to use the Nexus S (since its screen size is 480×800, so it will fit on my computer’s screen just fine)
- Target: Android 4.4.2 – API Level 19
- CPU: ARM (armeabi-v7a)
- Skin: No skin
- Use Host GPU: Check off if your GPU is powerful enough
- I left everything else as the default

Once done, the new device should show up on your Android Virtual Device Manager list. You can select it and hit “Start…” if you want to test it. Note that the reaction speed of the emulated device is heavily based on the speed of your computer.
Use Cordova
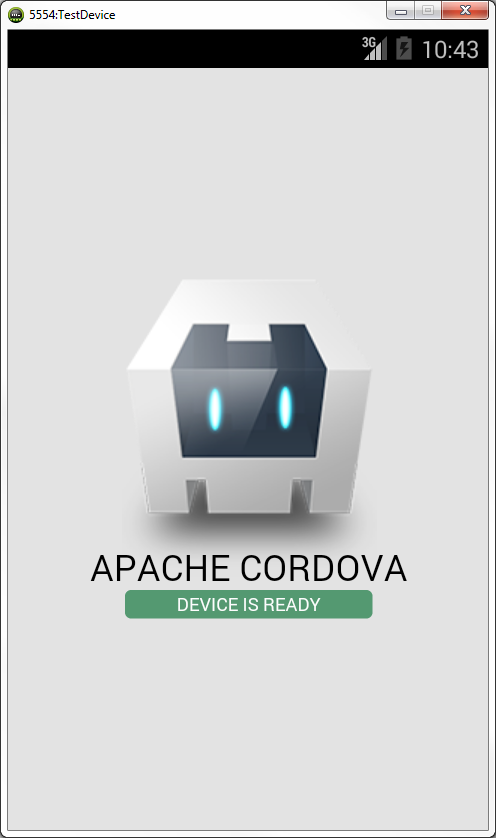
You can create a new Cordova project by running:
cordova create hello com.example.hello HelloWorldYou can then add a platform (specifically Android in this case) by running:
cd hello
cordova platform add android
And finally, you can run an Android emulator (using the virtual device you set up previously) by running the command:
cordova run androidCordova will then start up the Android emulator using the device you’ve just created, and once it boots, it will install and launch the test app. When it finishes launching, you can exit everything and begin editing the code inside the main “www” folder, and then rerun the “cordova run android” command to test it out.
Errors Encountered
“JAVA_HOME” Not Set
When working on Windows, installing the JDK does not “take over” for the JRE once installed. This appears to be because Windows checks the registry for the location of Java instead of checking the PATH variable. To fix this, you’ll need to edit the registry. As always, be sure to make a backup of your registry before editing anything. If you have a number of JRE versions installed, my recommendation is just to uninstall all of them, run CCleaner to fix up your registry, and then install the JDK.
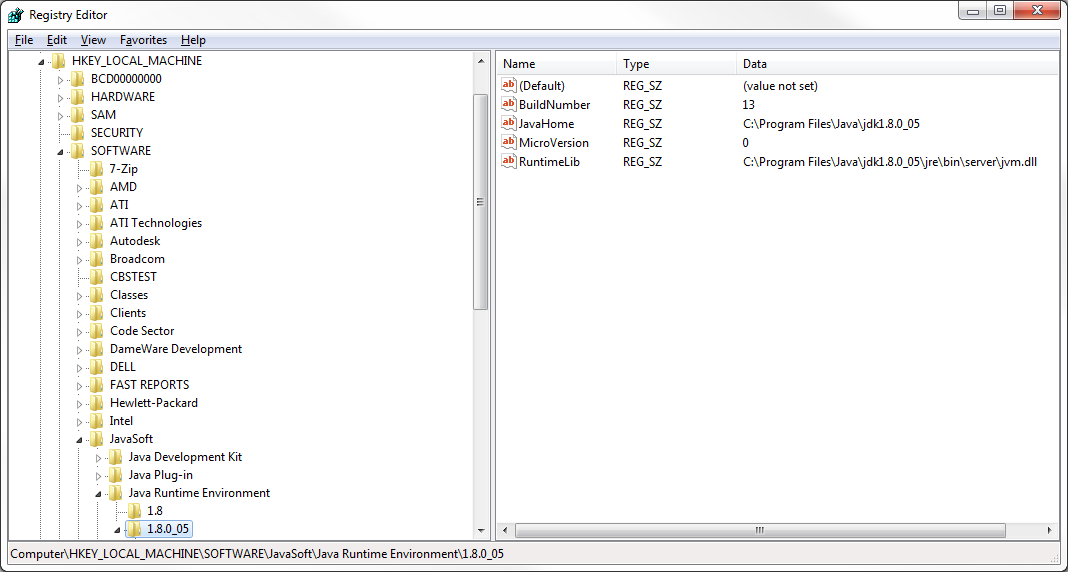
Fire up regedit and go to “HKEY_LOCAL_MACHINE/SOFTWARE/JavaSoft/Java Runtime Environment”. There, you’ll find a number of folders (named for their Java versions), and two important keys in each folder, JavaHome and RuntimeLib. JavaHome should currently be pointing to “C:\Program Files\Java\jre8”, and RuntimeLib should currently be pointing to “C:\Program Files\Java\jre8\bin\client\jvm.dll”. We need to change both of these to their JDK counterparts so that PhoneGap can compile the code for android properly. To do this, find the location of your JDK installation and change the keys.
Here’s an example of a working registry, after it’s been switched with the JDK. Note both the changes from JRE to JDK, and the new location of the .dll file:
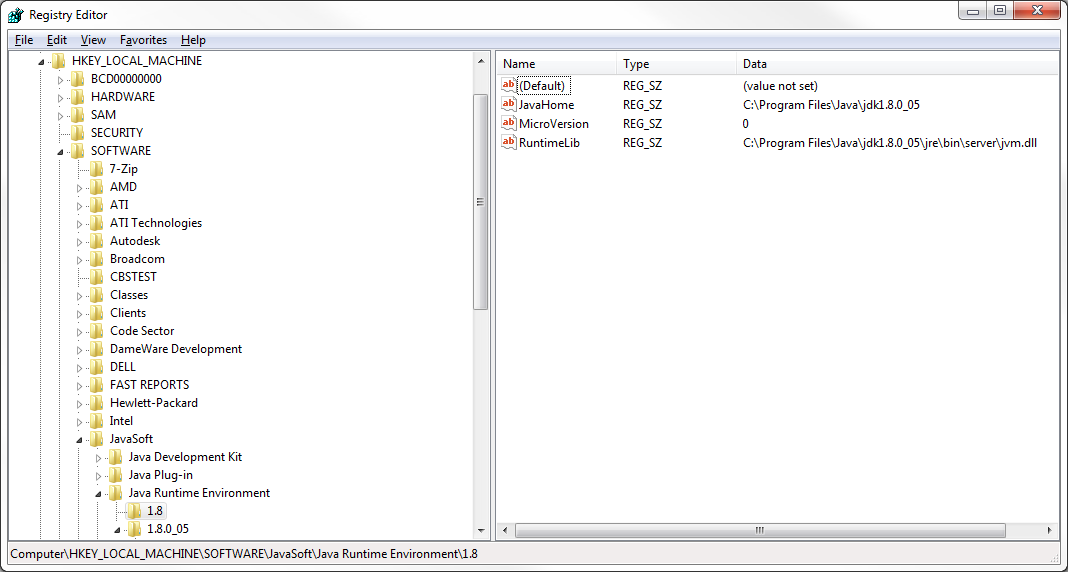
Once these changes have been made, you can exit regedit. All Java programs should continue to run normally, because the JDK includes the JRE.
32-bit Library Missing on Linux
If you’re using the 64-bit version of Linux, you may be missing ia32-libs. To fix this, you can simply run:
sudo apt-get install ia32-libsLink NodeJS and Node Folders on Linux
According to StackOverflow, there’s an issue with the naming of NodeJS where it’s sometimes referenced as “node”, even though that’s a conflict with an existing package. The name was changed to “nodejs” in some places, but not all. To solve this problem, run the following command to link the node directory to the NodeJS directory:
sudo ln -s /usr/bin/nodejs /usr/bin/node
Very useful. Save me days. Thanks.
It helps me a lot. Thanks
I wish I found your post a month ago, when I started developing. I landed here while trying to rever to cordova 3.6.3 because some plugins seem to frustrate the build for Android with latest cordova 4.x.
I keep getting an error with my ant installation. I have downloaded ant, extracted it and added the PATH, and when I try to build it just throws me “Error: Failed to run “ant -version”, make sure you have ant installed and added to your PATH.” Any ideas why its not working?
What happens when you just run “ant” from the command line? Or “ant -version”?
When I run “ant” it returns:
Unable to locate tools.jar. Expected to find it in C:\Program Files\Java\jre1.8.0_25\lib\tools.jar
Buildfile: build.xml does not exist!
Build failed
I do see that
C:\Program Files\Java\jdk1.8.0_25\lib\tools.jarexists on my machine so maybe it needs to be looking in the JDK instead of the JRE and some setting is wrong or something? Any ideas?Yeah, that’s definitely the problem (or one of them, at least!) – when you run java commands, you’re running them as the JRE, the Java Runtime Environment, which lets you run but not create. The JDK, the Java Development Kit, will allow you to create (or, rather, compile) Java. “ant” is a toolchain for building java programs, one step of which is compiling them.
Check your PATH – you most likely have the JRE in there, and the JDK either isn’t in there or is afterwards. Before making any changes to the PATH, be sure to back it up (you can just copy it into a text editor, not too complex)
My first PATH entry was
C:\ProgramData\Oracle\Java\javapathand I hadC:\Program Files\Java\jdk1.8.0_25</code in there at the end so I removed the first and moved the last one to the top of the list and I still get the same message.I see in my Windows System Environment Variables that there is no system variable for "JAVA_HOME"; isn't there supposed to be?
Yes – see the section “JAVA_HOME Not Set”
There’s probably a way to fix it, but the Windows PATH variable is a huge pain, in my opinion (coupled with the fact that the registry is involved). I honestly would suggest uninstalling all of the Java products on your computer, running a program like CCleaner (free for personal use) to remove it all from the registry, and just starting again.
Here’s what seemed to work for me, Jake (if it helps at all).
I went to Control Panel > Advanced system settings, “Advanced” tab > “Environment Variables…” and created a variable for both ANT_HOME (with path to ant folder) and JAVA_HOME (with path to Java sdk folder) and then removed what I put into PATH that didn’t work and added
;%JAVA_HOME%\bin;%ANT_HOME%\bin.Thanks for your help!
Glad to hear it worked out! The way Windows handles the PATH is so stange. Every time I work with it I end up hitting my head against the wall.
I definitely agree with you. I’ve never worked with Windows environmental variables before and realistically I don’t even understand their fundamental purpose.
Thanks, Very usefull