CrashPlan for Family and HomeLab Review
Introduction
I’ve been working with CrashPlan for about two years now, and I see it mentioned quite a bit on the HomeLab subreddit. I have the “Family” plan, which allows me to add up to 10 computers, and I use and abuse the unlimited backup space like there’s no tomorrow. Whenever I see CrashPlan mentioned, whether it’s a recommendation or a warning, I have yet to see a full write-up of the pros and cons of the system, so I thought I’d put my experience into a post. I don’t mean to advertise for it, nor do I mean to criticize it – I use it, and would recommend it to others, so long as the pros outweigh the cons. If the cons section seems far longer than the pros section, it’s because it’s difficult to say good things about backup software – best case scenario, it backs things up and doesn’t cause any problems – not a particularly riveting subject to write about.
Finally, this is a pretty long post – one that I’ve been working on for a while, and have been adding to whenever things come up. Not that I need to give you permission, but feel free to not read through the whole thing. I’ve provided a “table of contents” to let you skip to the different sections, as some may be relevant to you while others are not.
Contents
Pros
CrashPlan Is Cheap
CrashPlan is damn cheap. With a one-year subscription, I pay only $149.99 for up to 10 computers. That includes my immediate family, significant other, my laptop, my desktop, and my servers. That’s incredibly cheap for the peace-of-mind that your data is always backed up, in real time.
Backup Is Unlimited
CrashPlan’s backup is unlimited. My desktop has over 3TB on it, and my NAS, which backs up my desktop as well as holds my media files, has another 4TB. In addition, I have a virtualization server, whose VMs are also backed up to CrashPlan. Finally, I have my family’s computers – in total, there’s roughly 8TB on my account, and it didn’t cost me any more money than if I had 8GB, or 80TB. Backup space is unlimited. That being said, CrashPlan does appear to limit your upload speed – but more on that later
The Basics Are Easy
The basics of CrashPlan are dead simple – install it, log in, and your stuff starts backing up. That’s it. You’ll get an email weekly by default that shows you the percentage of files backed up on the various computers on your account. It’s lovely. When someone calls me because they accidentally deleted a file, I can simply log in to the website and restore a file from their computer, and email it to them or put it in DropBox. I’d write more about how easy it is, but there’s really very little to write – for the most part, the basics just work.
Cons
Deduplication Is Per Installation
Deduplication Is Per Installation
I have a desktop with a ton of media files on it – all my family’s pictures, all of our home videos (converted from VHS), all of the multimedia projects I’ve worked on over the years, etc. Sometimes my data is a ton of smaller files, like pictures, but sometimes it’s a ton of gigantic files, like 20-minute uncompressed videos from my DSLR. In any case, deduplication is a great feature in case I have more than one copy of a large file, or large group of files, on my computer – but I rarely do. Having multiple copies of the same large file on one computer is a waste of space.
However, I make backups religiously – using CrashPlan, of course, but I also have a Synology NAS where I keep copies of all of my data. The problem, though, is that even though all of that data has already been uploaded to CrashPlan, it needs to be uploaded again from my NAS. If I make a 5GB movie and copy it to my desktop, then copy a backup to my NAS, 10GB has to be uploaded to CrashPlan. Although deduplication is run per-computer, it is not run across the entire account. In fairness to CrashPlan, it may be a security concern if they run the deduplication accross your entire account, depending on how they encrypt your files. Furthermore, it would be extremely difficult for them to run deduplication for every file accross the roughly 8TB of data that’s been uploaded across the 10 computers on my account – and if they ran it on my computers, it would be an even bigger strain (and take even more RAM). But still, it would be a nice option.
The consequence of this is that if you are adopting CrashPlan within your home or business, depending on your network speed, you may want to install it only on the computers with primary copies of your data BEFORE you install it on any backup devices – this ensures that all of your data will be uploaded first, then you can get to work on uploading the backup copy. Otherwise, should something happen midway through backing up, you risk having only half of your primary data uploaded, and half of your backup data uploaded…and for all you know, it might be the same half both times.
Initial CrashPlan Uploads Are Slow
Initial CrashPlan Uploads Are Slow
Like I said in my introduction, I’m not looking to advertise for CrashPlan, nor am I trying to warn you about them. With that in mind, let’s just get this out there – CrashPlan uploads are slow, at least initially. And they know it. Everyone knows it. It shouldn’t deter you from buying it, but I’m tired of seeing so many forum posts where people complain that their uploads are moving slowly. I get between 3 and 4Mbps upload speed (despite paying for 50Mbps upload, and getting it, according to speedtest.net), which means it takes a reaaaaaally long time to upload 3TB – months, in fact. Once that initial upload is there, CrashPlan is pretty awesome.
There are a few articles and responses that I think warrant listing here, because any time you mention that CrashPlan is slow in a forum or to CrashPlan support, one of these will get mentioned. Others are just here to prove that it’s not just me that has slow speeds.
- CrashPlan is Slow novelty Twitter account – inactive since 2014, but they joined in December of 2012 – honestly, not much has changed since then.
- One of many Reddit posts about how slow CrashPlan is. You can see from the top-voted post that a user had to delve in to the CrashPlan configuration files to get the real stuff done. According to the anecdotal evidence in the post, by changing the default options in the configuration files, the user was able to triple their throughput. That being said, their limiting factor was their CPU (which was being used at 100%) – none of my CPU cores ever hit 100% during the initial backup, so deduplication wasn’t the issue at all. Making this change did not triple my upload speed. Please stop telling me to change my configuration files – it’s not a magical fix.
- CrashPlan article #1, entitled “Backup Speed Does Not Match Available Bandwidth” – seems like exactly the kind of article that would help me fix my problem of having 50Mbps of bandwidth but not being able to use it with CrashPlan. Unfortunately, the article borders on condescending – maybe it’s helpful for your average user, but it’s completely worthless for a “power user” (read: someone who knows how a computer works). Some highlights include:
- “Bandwidth is a theoretical maximum, and applies only to your connection to your ISP, not the internet in general” – while that’s not false, it’s completely unhelpful. Other applications (specifically BackBlaze, which I also have on my desktop as a backup backup) are able to use my full bandwidth. I really am receiving 50Mbps upload on average. Uploading to various other services works just fine, which narrows the problem down to CrashPlan. That ain’t theoretical.
- A section entitled “Upload Versus Download Speeds” – I guess some people get confused between upload and download speeds from their ISP – their ISP might advertise that their internet package is “10Mbps”, but then people see 2Mbps in CrashPlan – perhaps that’s because their download speed is 10Mbps, but their package’s upload speed is 2Mbps. This section might clear something up for such a person. Unfortunately, I’m certain that my upload speed is 50Mbps.
- A section entitled “External Factors Affecting Backup Speed” – honestly, at this point this isn’t even worth reading. They still haven’t mentioned anything that might even remotely be CrashPlan’s fault – even to the degree of “Please check our status page to make sure our service is up and running smoothly, because we might be having a network outage that could slow down upload speeds”. Meaning that now they’re literally blaming things that are “external” – no, my network is fine, and was fine for the entire three month period it took to upload my data. Take a little responsibility, CrashPlan.
- A “What You Can Do” section – this is exactly where I’d like to find out, well, what I can do. Unfortunately, it mentions things like rebooting my router and making sure I didn’t accidentally turn on CrashPlan’s network throttling feature. OK, so my router is rebooted, and CrashPlan is still going at the exact same speed. Now what do I do? Nothing, apparently, since we’re at the end of the article. Thanks for nothing, CrashPlan Support.
- CrashPlan article #2, entitled “Speeding Up Your Backup” – I’ll go into much less detail here, but it’s more of the same – nothing worthwhile at all, and more passing the buck to other things that could slow down CrashPlan – no actual advice on how to speed it up.
- A section entitled “Considerations” – this begins by telling me how backups and uploads work, and that’s rude. They already have an article on how it works (which they link to in this section…and paraphrase it anyway)
- A section entitled “CPU Usage” – I have a powerful CPU, and have CrashPlan set to be able to use up to 100% of my CPU, all the time. It never reaches 100%, and therefore is not a limiting factor. This section did not speed up my backup.
- A section entitled “Frequency Settings” – a somewhat useful reminder that just because a file has been uploaded, it doesn’t mean that it won’t have to be uploaded again, because you may have made a change to it. Fair, but my initial upload is still moving at 3Mbps, so even if I don’t add to the files by editing something, it’s not actually getting faster – it’s just not getting slower.
- A section entitled “Network Settings” – this section again tells me to not use the network throttling…or my uploads might get throttled. But they’re off by default, and off for me, so there were no changes to be made.
I have yet to actually find a way to speed up CrashPlan’s upload. If you have a way, let me know in the comments section – that being said, if your solution starts with “All you have to do is stop CrashPlan and edit the cryptic configuration files, and then this magic change will make everything super fast”, you should feel free to not comment at all – see below.
Hope you like configuration files!
Hope you like configuration files!
A lot of CrashPlan’s administration can be done via the GUI – things like which directories can be backed up, how much of your CPU CrashPlan is allowed to use, etc. However, there are certain things that simply can’t be done via the GUI, and the instructions from CrashPlan’s support team usually involves editing configuration files.
As a Linux user, I’ve poked around in my share of configuration files. However, CrashPlan makes things particularly difficult. For one, there are a number of different configuration files, and it’s not entirely clear what controls what until they tell you. While the CrashPlan GUI makes it easy to set a rule like “only use 90% of my CPU”, you’ll need to edit the configuration file to allow CrashPlan to use more RAM – which you’ll need to do if you have a large amount of files. You can turn on CrashPlan’s deduplication feature using the GUI, but you can’t control things like how large a file has to be before it’s a candidate for deduplication without going to the configuration file (and this is important – deduplicating every single tiny file can put a serious load on your CPU, but just uploading the tiny file would solve the problem near instantaneously).
Java
This one isn’t all that much of a con, but it can be for some system administrators (who would probably be using CrashPlan for Business as opposed to their Family Plan, but that’s written in Java, too). CrashPlan is written in Java. Java has had a number of security issues in recent years, and the installation from Oracle tries to make Yahoo your search engine, which is frankly a pain in the ass. You can always use Ninite to install it, which is one of my favorite projects on the internet – but still, it’s a pain.
Update: According to Reddit user StrangeWill, the JRE is actually bundled with the CrashPlan installation.
RAM Usage
Now we’re getting into some of the bigger issues with CrashPlan. CrashPlan eats up RAM like there’s no tomorrow. With my 3TB of data, the CrashPlan service takes up about 3.5GB of RAM. The CrashPlan GUI, when it’s open, takes up about 300MB of RAM. That’s basically one GB of RAM per TB of data, which is the rule-of-thumb that I go by (and is somewhat recommended by CrashPlan themselves – see the table on this page).
Experiences here may vary – I’ve seen some cases where CrashPlan doesn’t require as much RAM for roughly the same amount of data – but I would bet that that’s dependent on how many files actually make up the data – i.e. a million smaller files vs one gigantic file most likely have different RAM requirements.
It’s debatable what the average RAM-to-storage ratio is, but it’s highly unlikely that the average person has as many terabytes of data as I do. That being said, BackBlaze backs up the exact same amount of data on my desktop, and has, to my knowledge, never hit 200MB of RAM usage, with the GUI and the service combined. It appears that CrashPlan keeps a file list in RAM at all times – I’m not going to argue with how they architect their system, but I will say this – that’s a lot of RAM.
And as a last note on the subject – there exists a very real possibility of having a ton of storage on a given system, and comparably very little RAM – a storage server, or network-attached storage (NAS). In these cases, the goal is to pump a server full of as many hard drives or SSDs as you can, in the hopes of creating a huge storage pool for all of your data – and such a system doesn’t need much RAM at all, unless you’re running some other service, like caching…or CrashPlan. More on my Synology NAS and how it works (poorly) with CrashPlan later.
Lack of Web Administration
One of the most egregious things that CrashPlan is missing is a way to administer a CrashPlan installation over the internet. Pretty much the only thing you can do via their website is restore a file, or pay your bill. You can’t change which directories can be backed up, or any other settings, via the web.
Here’s a scenario that has happened more than once to me. With CrashPlan, you get weekly emails about what percentage of data each computer on your account has been backed up. Most of the time, computers are at 99% or 100%. However, occasionally a computer belonging to a family member will drop to something like 40% – because they don’t have all that much data, but they’ve just copied on a few seasons of a TV show. Well, I’d really like to remove that directory from backup, or it will not only eat up CPU/network speed, but it will prevent other, more important files from being backed up. In other words, until that percentage hits 100, I won’t be sure that everything is backed up. How do I fix the situation? Either call the person and walk them through removing the directory, or remote in to their computer and do it myself. I’ve tried to impress upon my family that they need to put all movies and TV shows in one directory that I created for them, and removed from CrashPlan’s backup – but you know how that goes.
Sidenote: Technically, according to this CrashPlan article, having so many large files added won’t necessarily block other files from being backed up. It appears to say that newer, smaller files are given the first priority – this is good news, because that means that if you add a ton of TV shows, a tiny book report will still be backed up first. That being said, it’s unclear where changes fall in this – is an old file that gets modified considered a new file? Because something like a book report would get added to all the time. And even with these changes, there are files of similar size and age that still need to be prioritized differently – for instance, a folder of TV shows need not be backed up, but a folder of family videos does need to be backed up. A folder containing a lot of small MP3’s need not be backed up, but a folder containing a lot of family pictures does need to be backed up. There’s no way to tell CrashPlan which folders to back up and which folders not to back up without doing it directly from that computer’s GUI.
GUI/Service and Running Crashplan “Headless”
GUI/Service and Running Crashplan “Headless”
I admit to not being an expert in server/client architecture, but what I do know is that as an end-user, CrashPlan’s architecture makes it very difficult to manage multiple installations.
Let’s ignore, for a second, that CrashPlan has no web interface – we know that it does, in fact, have a user interface. It also has a service, which runs in the background and backs up your files. But what happens if you want to back up files on a server, which may not have a monitor attached? Sure, you can always remote in, but some servers don’t have a user interface at all – they just have command line access. Other servers, like the Synology NAS that I discuss below, have a web interface upon which CrashPlan’s Java GUI simply will not run.
So what do you do in this case? Well, you can still install CrashPlan, which again comes with both a GUI and a service, and just not use the GUI, since it won’t launch. Then, you can install CrashPlan a second time on another computer on the same network, but disable the service completely, so that you’re just using the GUI. Then you can connect the GUI on one computer to the service on another computer or server, allowing you to administer that server’s CrashPlan installation, despite not actually working on that server directly.
If this seems a little complicated to you, that’s because it is. CrashPlan uses a ton of configuration files, but has no convenient way to get its status without looking at it within the GUI. For instance, while you can start the CrashPlan service from the command line, you can’t query the service to find out how much more it has to back up – the only way to see this is from within the GUI. With no web interface and no command line interface, your only choice is to connect one computer’s CrashPlan GUI to another computer’s CrashPlan service. As a sidenote, it is, as far as I know, impossible to install just the GUI in one place and just the service in another place – CrashPlan’s installers come with both, no matter what.
There used to be an amazing podcast called Buzz Out Loud, where they’d discuss various technology stories. They had a running joke about listeners using the phrase “All you have to do is…” – basically, the hosts would say something like “You can’t do X”, and a listener would call in and correct them, saying “You absolutely can do X, all you have to do is…” and then rattle off an extremely long list of instructions on how to get “X” working. It really hammered home the point that just because something is possible, it’s not necessarily easy by any means, and us computer folk have a tendency to view things as fun challenges, while others would see those same things as insane, daunting tasks. This is most certainly one of those cases.
It used to be the case that if you wanted one CrashPlan GUI to connect to another CrashPlan service, all you had to do was edit a configuration file to point the GUI to the other computer or server’s IP address. Even this was fraught with problems, though – if CrashPlan couldn’t connect, it would simply tell you “CrashPlan is unable to connect to the backup engine”. It wouldn’t tell you why. It wouldn’t give you any more details than that. Your choices were either to retry, or to cancel. But at least when it worked, it worked well – the GUI would show the backup information from the service on another computer. However, it never quite went 100% of the way – the taskbar icon would show the backup status of the local, administration computer, and if that computer didn’t have the CrashPlan service running, the icon would turn grey. Hovering over the task bar icon would not tell you the status of the remote computer. You could only see the remote computer’s information by fully opening the GUI.
Then CrashPlan changed things, making it “more secure” – now connections between a GUI and service have to be encrypted via SSH. While this is technically more secure, they did it in an incredibly stupid way – CrashPlan GUIs were already able to communicate to CrashPlan services, so they could have just encrypted the communication that gets sent over the network, within the CrashPlan application itself. Instead, they now make you open your own SSH session in order for CrashPlan to communicate – instead of baking in SSH to their app, they make you do it for them. Here’s the article on how to do it – it’s incredibly complicated for the use-case of “I want data on my server backed up”, followed by “I want to control what data on my server is backed up” and “I want to know how much of my server’s data has been backed up”.
I’ll warn you now, this is a bit of a rant. But I don’t care. CrashPlan’s implementation is so awful, it’s deserving of a rant. Let’s start with the diagram that CrashPlan has on their page:
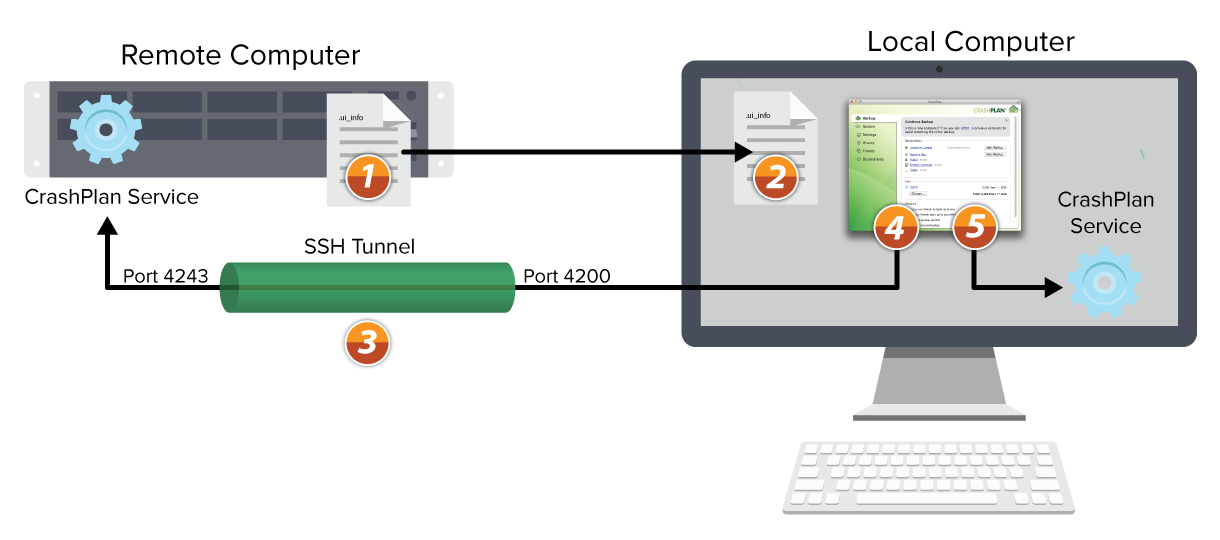
That sure is a lot of arrows for a client/server set up
There are a number of problems here. First, note that the SSH tunnel is completely outside of either CrashPlan program – you set up this tunnel. Second, note that the tunnel uses a different port on either end, and not even sequential ports at that – while using different ports is common with different applications, CrashPlan could definitely be built to have the GUI and server use the same port. Third, note that on the “Local Computer”, there’s an instance of “CrashPlan Service” running – but that sucks. I want the local computer to only have the administration tool, and for the “Remote Computer” to run the CrashPlan backup service. That’s not even an option in their picture.
Next, take a look at the instructions on their site. Despite the fact that I have full administrative access to both the remote and local computers, they’re not going to make it easy. I can’t export a control configuration file from one and import it into the other. Instead, “all I have to do is…” log on to the remote computer and open a configuration file, copy the authentication token, and put it in my local computer’s CrashPlan configuration file (noting that the changes are RESET EVERY TIME THE SERVICE RESTARTS, making this configuration useless in the case of restarting a computer…jeez), edit my .ui_.properties file as well for some reason (because there’s no way they could keep all of the connection information in a single configuration file), use SSH to forward one port to another (which requires leaving Putty open Windows), and finally, maybe, just maybe, CrashPlan will work. What do you do if it doesn’t? Well, you did one of the steps above wrong. Which one? Good luck finding out. CrashPlan won’t tell you that it tried to connect to a specific port but failed, or that it couldn’t find the specific IP address, or that it knows that it reached the CrashPlan service on the other computer but that you have the wrong configuration file. It just tells you that it was unable to connect. It’s incredibly frustrating, and is a huge gap in what I expect from the software and what I actually receive.
And don’t get me started about how difficult it would be to administer more than one remote computer. Sure, you could write a script that would modify BOTH configuration files and also create an SSH tunnel between the remote computer and the local computer, but then you’d also have to pull the authentication token from the remote computer, as well as modifying the local computer’s configuration every time the service is reset (like in the case of restarting your computer). You could have a different script for each of your remote computers. But that really seems like something CrashPlan itself could handle – especially because they’re all signed in to the same CrashPlan account, and all I want to do is know what percentage of the backup is completed.
CrashPlan on a Synology NAS
The reason why I wanted to manage CrashPlan remotely is so that I could have CrashPlan running on my Synology NAS. Does CrashPlan work on a Synology NAS? Yes, but this is yet another case of “all you have to do is…” – you see, neither CrashPlan nor Synology directly support each other, so it’s a huge pain to get everything set up, and it can break at any moment. This particular section of this post actually incorporates a number of other sections, so if you see something that confuses you, another section might clear something up.
Synology devices run their own operating system, which is based on Linux but isn’t full Linux – the shell they use is BusyBox, which is a heavily slimmed-down shell that allows for basic commands to be run. If you’re familiar with the Linux command line, it can be really frustrating, because not all commands are available. To get everything working, I followed this guide – which, though it works, is an incredible number of steps. To summarize:
- You have to enable certain features (the “user home service”) of your Synology device
- You have to add an external repository (which we sincerely hope is trustworthy)
- You need to install Java (which is not easy, because you have to download the Java installer directly from Oracle’s website – and make sure you have the right one, depending on the processor architecture of your Synology device). You manually move the Java installer file onto the NAS, then use the Java Manager (which you download from the external repository) to set it up
- You get the CrashPlan installer from the external repository
- You set up CrashPlan on another computer, to use its GUI to control the service on your NAS – but it’s an absolutely awful process
- And finally you may have CrashPlan working. If it’s not, good luck digging through CrashPlan’s logs on either your local computer or on the NAS. And good luck getting either Synology’s support or CrashPlan’s support to help you.
It’s honestly a stupid number of steps. Also, as previously stated, CrashPlan can…crash…at any time on Synology devices. Every time CrashPlan gets an update, it can potentially break your installation, and you have to follow yet another stupid set of steps to get it to work again, this time delving into the BusyBox command line of your NAS to get GUID’s, manually download and extract installer files, and figuring out how to type while keeping your fingers crossed, because it’s not going to work the first time.
Because of all of this, I decided I would just run CrashPlan on a full Windows installation, but point it at my Synology NAS. But that’s not so easy, either.
Network Drives
After fighting with CrashPlan on my Synology NAS for so long, I came to a realization – my computers can all see the files on my NAS (after all, that’s the point). My computers have CrashPlan on them. Can CrashPlan back up files from a network folder? The answer is yes…but it’ll make you work for it.
The issue with backing up a network drive on Windows is that Windows handles networked drives in a strange way – this means the blame is mostly on Microsoft for the crazy workaround, but nonetheless, I bought CrashPlan to back up my data. All of my data. Whether it’s on an internal hard drive or on network attached storage, I want my data backed up.
In any case, CrashPlan offers a guide on how to do it. To summarize the guide, it appears that CrashPlan is run under the SYSTEM account in Windows, which has special privileges that CrashPlan takes advantage of when it comes to watching your filesystem. Unfortunately, when you map a network drive, it’s mapped under your user, not the SYSTEM user. It appears that these drives cannot be seen from a program run as the SYSTEM user. To get around this, the CrashPlan article instructs you to instead write a .bat file to connect to the network storage, and to create a Scheduled Task to run that batch file – and from within the Scheduled Tasks interface, you can instruct the task to run the .bat as the SYSTEM user. This allows the networked drives to be attached as the SYSTEM user, which programs run as the SYSTEM user can see. Now your network drives will show up in CrashPlan.
These steps are certainly nowhere near as difficult as the Synology steps, but using CrashPlan to back up a network drive is just not as simple as using CrashPlan to back up an internal drive.
Conclusion
In conclusion, I like CrashPlan. It gives me peace of mind to know that all of the files on my computers and servers, as well as the computers belonging to my family, are all backed up. The price point is great, and storage is unlimited. However, administration leaves quite a bit to be desired, and I’ve had to employ a number of workarounds to get everything backed up. In addition, while CrashPlan is a bit of a resource hog in terms of RAM, it certainly does not make full use of my internet bandwidth, leading to a really slow initial upload of quite a bit of data. In all, I would recommend CrashPlan, so long as none of the cons I listed here outweigh the pros.
Agree? Disagree? Did I skip something? Feel free to let me know in the comments below.